
Microsoft Dynamics Package Deployer - All You Need!
Tuesday, Jan 08, 2019
What is Package Deployer?
Package Deployer is a tool that was added to the Microsoft Dynamics 365 SDK for enabling administrators to create a package that enables you to deploy, with a simple UI, using customized HTML pages that inform the package end-user the information that you want to share. The package may contain the following:-
-
Solution: You can add one or more solutions to the package and it will be deployed in the sequence.
-
Flat data files: You can add one or more flat files to be added to the package.
-
Data files (exported from Configuration Migration tool): You can add the data files that were exported from the configuration migration tool that you can find in the SDK.
-
Custom code: You can add your custom code that runs before, after or while deploying the package.
Create Your First Package
To create a package, you need Visual Studio 2012 or a higher version with .Net Framework 4.5.2. And you must add Microsoft Dynamics 365 SDK templates to the Visual Studio by downloading from VS Market Place here. Or you can download template files from here then install them.
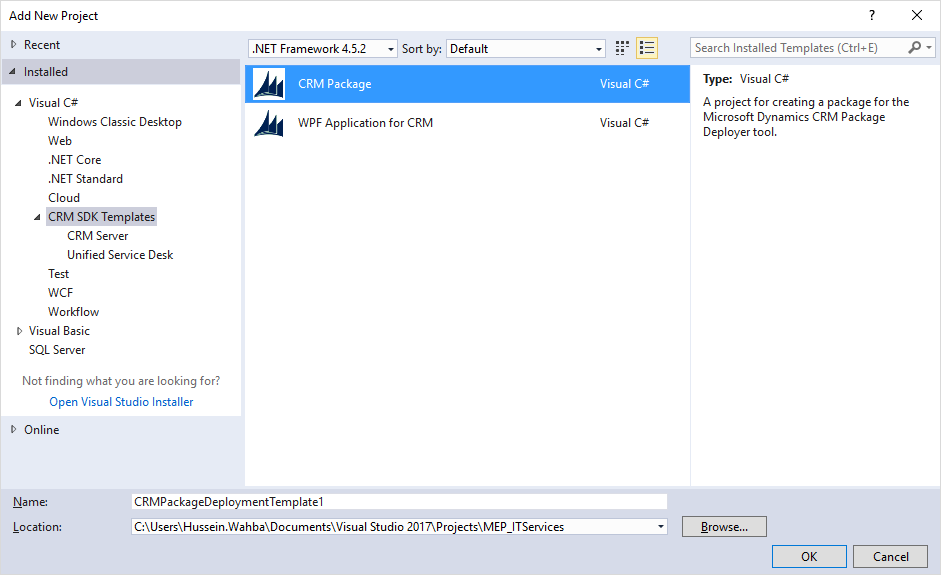
After adding the templates to the Visual Studio, you can create a project of type CRM Package.
Solution Content
After creating the solution, you will find its contents as follows:
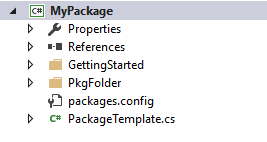
- PkgFolder: In this folder you will add all your files, solutions, flat data files or data files exported using the Configuration Migration Tool.
- ImportConfig.xml: This file will be found inside the PkgFolder. In this file you will specify the data files and solutions that you want to add and their sequence and configurations. It will be described in details in a following section.
- PackageTemplate.cs: In this file you can write your custom code in the related event trigger. Also the triggers will be defined in a another section.
- Content: This folder is under the PkgFolder and here you can find the HTML files for each language. Also under each language you can design two HTML pages: one for welcoming the user and another at the end of deployment.
Set Configuration Values of the Package
As we said "ImportConfig.xml" is a file that you can manage the package content and sequence of solutions and data. Below is a table that you can see the meaning of most important tags and attributes.
| Parameter | Description |
|
crmmigdataimportfile |
Here you can set the name of the default data file that you exported from data configuration migration tool. You can set different data file for each language (LCID). It will be described in the node <cmtdatafile>. |
|
cmtdatafiles |
This node contains an array of <cmtdatafile> nodes that contains localized version of the configuration data file to be imported. |
|
cmtdatafile |
Use this node under the <cmtdatafiles> node to specify the localized configuration data files along with locale ID (required) and user information map file (optional). <cmtdatafile filename="data_1033.zip" lcid="1033" usermapfilename="UserMap.xml" /> |
|
solutions |
Contains an array of <configsolutionfile> nodes that describe the solutions to import. The solutions will be imported on the target Dynamics 365 instance in the same order in this node. |
|
configsolutionfile |
Use this node under the <solutions> node to specify the individual solutions and the following information for each solution to be imported: solutionpackagefilename (Required): The .zip file name or the relative path of your solution. overwriteunmanagedcustomizations (optional): Specify whether to overwrite any unmanaged customizations when importing a solution that already exists in the target Dynamics 365 instance, and the default value is to maintain the unmanaged customization. publishworkflowsandactivateplugins (optional): Specify whether to publish workflows and activate plug-ins SDK messages in the target Dynamics 365 instance after the solution is imported. and the default value is true. |
|
filestoimportnode |
Contains an array of <configimportfile> and <zipimportdetails> nodes that are used to describe individual files and zip files respectively to be imported. |
|
configimportfile |
Use this node under the <configimportfile> node to describe a file to be imported to Dynamics 365. You can add multiple files in a package by adding as many <configimportfile> nodes. |
Events and Pipeline
The pipeline of the deployment starts with deploying all the solutions then importing the data files, and you can attach your custom code to the events that were defined in the file "PackageTemplate.cs" as in the following table.
| Event | Description |
|
InitializeCustomExtension |
Called When the package is initialized. |
|
BeforeImportStage |
Called Before Import Completes. |
|
RunSolutionUpgradeMigrationStep |
Called while a solution update is occurring. |
|
AfterPrimaryImport |
Called after Import completes. |
Also there are some functions that get the properties from the created package such as GetNameOfImport, GetImportPackageDataFolderName, GetImportPackageDescriptionText and GetLongNameOfImport.
Create the Package Files
After finalizing the configuration and coding the package, lets start the deployment. It will be as in the following.
-
Build your project.
-
Copy the folder PkgFolder and YourProject.dll file.
-
Paste this files to Package Deployer folder that you will find inside Microsoft Dynamics SDK.
-
Now this folder is your package that you can deploy with, just run the package deployer exe file, choose your CRM organization, enjoy your deployment.
Pros & Cons
Pros: Creating a package that contains CRM solution, data and custom code is a very useful tool that we may extend its usage to create a package that contains also web services or any extra component to be published with the package to make the deployment much easier.
Cons: The component has some challenges that need a workaround to be solved as we will discuss in the next section.
Challenges and Workarounds:
-
Importing solution that depends on data: Sometimes we use lookup values (for example a configuration entities) inside a solution component such as workflows or business rules so the data should exist before importing the solution. It is not applicable to deploy a solution after importing the data in the same package. As a workaround, you can apply one of the following solutions
- Split the package into two packages. The first contains the configuration entities that are mentioned in the workflows and its data file. The second contains the workflows that refer to the configuration records.
- Write a custom code that creates the needed records with the same identifier then activate the workflows and business rules that may be affected.
-
Importing the same solution with the same version: while importing a solution that is available in the targeted CRM environment with the same version it will be skipped. As a workaround, you can write a custom code that changes the version of CRM solution or deletes the solution from the targeted environment if the solution is unmanaged. If the solution is managed, the solution entities and its data will be deleted.
References:
- https://docs.microsoft.com/en-us/previous-versions/dynamicscrm-2016/developers-guide/dn688182(v=crm.8)
- https://stackoverflow.com/questions/32597604/how-can-i-overwrite-an-unmanaged-solution-when-using-deploying-a-crm-package
- https://technet.microsoft.com/en-us/library/dn647420.aspx
If you have any challenges, thoughts or any additional information, please leave a comment.
Thank you for reading the article.
Comments
No comments yet
You must login to add your comment.